
ModiBot on YouTube
After meeting with Drew Bennett from BenSpark.com the other day, he suggested posting a video of me putting the newest kit together. That dude is smart about the blogsphere, so I threw one up. I guess I’ll see if I can drop this into my Hex model page on Shapeways, also.
Back in action!

This gallery contains 22 photos.
10 months since my last post!?! Yeesh, you’d think that I could at least get something posted once a month. I guess its not like I haven’t been busy- Mentoring with the Sproutel team at Betaspring on their incredible Jerry the Bear product, put out a really fun (if not entirely successful) Kickstarter campaign, set-up […]
ModiBot Logo

One more step in the process, BEHOLD the ‘essentialist’ logo! Not the most jazzy thing in the world, but playful, retro, and most importantly, done.
Generated a couple QR codes for the future KidMechano.com and ModiBot.com sites.


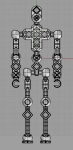
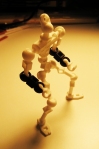
ModiBot Core figure kit Ver1

Stoked! Last night, I finished putting a whole kit together, posted it to Shapeways and ordered two full figures. Oh, yeah.
Matched up the parts pretty well (all with new X ball design, open sockets, and cruciform shafts). Just noticed that I didn’t cruciform the wrists on my hand parts, but that will have to wait for now. Threw the knife and sheath in for good measure. We don’t want to have a figure without something to do.
These will show up on or around the 13th. From there, I’ll start focusing more on accessories and the outer build system. My rudimentary 3d skills have gotten me this far, but the next round will be a bit tougher, using softer and more complex mechanical and organic shapes. That’ll be a fun thing to sketch on over Xmas break.
I’m going to drop one in Wyatt’s stocking. He’s been pretty interested in how its all evolving, but frustrated that he can’t play with all my proto parts laying around on my desk.
Check out the pics!


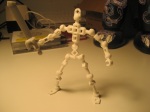
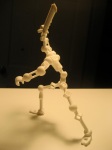
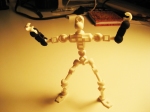
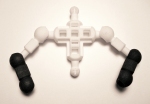
Complete posable figure

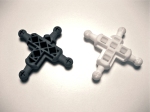
Big Balls. That’s a problem.
Another round of parts. This time I upped the ball size to create more tension in the joint. That definitely worked, maybe a bit too well, so I’m going to bring the ball back down a bit. The one nice and unexpected side effect of the bigger ball is that as the grit wears out of the joint faster, but it still keeps a nice amount of tension. The ball becomes shiny and, I’m guessing, also wears the interior of the socket down
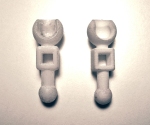
Let’s see. What’s new in the pics? The arms have the new cruciform post design to minimize the material usage. Which seem to still be fairly robust. This nylon material from Shapeways is pretty nice. I haven’t had any breakage so far. Maybe I should try to break something just to get a feel for the amount of pressure it takes.
The other new thing is the the newly designed forearms. These are Xevoz-compatible (the future ‘ModiBotX’ body), but also have a smaller wall thickness on the wrist socket. The hands shown are from last round and still have the smaller ball (and shorter shaft design that didn’t work or look as well on the original forearms with the larger sockets. The tapered look is great and the wall thickness doesn’t seem to creating a breakage problem. Something to pay attention to over time.
The only other thing is the new ‘X’ cuts in the ball. These are intended to create some ‘give’ in the ball and seem to be doing their job. I’m somewhat wondering if this design will cause more wear in the joint. I’m prepared with a couple other options if this becomes a problem.
The posability seems pretty damn good. I’m getting a lot of travel out of the elbows. Much better than many of the ball joint figs on the market (it helps that he’s so skinny). I’m not quite sold on the current ankle design, but it mostly seems okay.
I guess the next phase is to start to assemble an entire kit. I’m going to push farther to reduce the material in the figure. Maybe cut some material out of the sockets with a pass-through and try the cruciform design on the other parts to see if they maintain their integrity. The cruciform is a bit ugly, but my goal is to get an entire figure down to $10 cost of material from Shapeways. I think I have a long way to go. The big shift will be to modify all the parts so I have a full Modibot Core body kit and a full ModiBotX body.


Vs. Battle! ModBot vs Uncube!

All this focus on Modi and I forgot the cute little Uncube that came from Ponoko the other day. The material seems fairly durable, but the wall thickness feels like it might be prone to breakage at the edges.
This was a fun ‘sketch’, but I think I need much more ‘Un-‘ in my Uncube. I’ve got a few more sketches that i want to explore. I keep coming back to a concept that houses swatches of different 2d materials- like cut felt, cork or magazine clippings or whatever. That might be a fun item to test and perfect using Ponoko since they have both 2d and 3d capability.


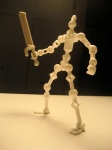
Knife (Machete)

Finished a knife the other night. Pretty pleased with how it turned out, but… I just put it in context to the figure. Pretty damn big.
Sooo, I suppose its a bit more like an Appleseed tactical ‘sword’ or machete at this point. Still had fun doing it.


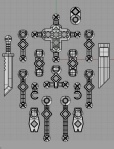
Possible improvements

Since we’re running with this whole ‘constant beta’ mentality that is being discussed a lot in the start-up world, here’s a few new updated parts. I’ve already shifted many around, taken some down and hopefully made the system better and robust at every turn. Kaizen has worked out pretty well for the Japanese, right?
I built up the balls a bit and redesigned my compliance slots in the ball to see if they add anything. The sockets tend to flex to create compliance, but I wanted to see if this makes any difference. After playing with all the parts tonight, i think the new ball size might be too large, but we’ll see. Parts should be here on Dec 2nd or so.
What else? Oh, yeah, material efficiency. I cut a couple parts down a bit to see if making a cruciform cross section makes the shafts less sturdy. K’NEX use a cruciform shaft, so I think its worth the try. We’re probably saving pennies, but everything helps.
So, in addition to some new upper arms, torso and hip, I redesigned a forearm. Mostly because they were just too damn ugly, but the added bonus was that I cut a sizable amount of material out of the design. I also created a very small, thin-walled socket for the wrist. Its pretty teeny, but hopefully still robust. When they come in, I may try to tilt the socket a bit more to let the wrist bend more naturally. I moved the socket on the feet and you can see from my last post that the feet actually have a pretty good amount of travel. I’m pretty pleased with the new design, now I need to work it into the ‘diamond’ configuration. I’m guessing it won’t be as pretty as this design.


Delayed gratification

In the product world, it takes a long time to get product to shelf, but you are trying to put so many items through the pipeline that you don’t have a lot of time to ‘sit around’ waiting for something to show up. I got my 3rd round of parts in the mail today. Once I started designing the parts and working up a library of baseline components, it started to get easier.
After a lot of late nights (after the kids went to bed), I got a full figures worth of parts (in model form anyway). Great, right? Yeah, but by that point, I’d fallen behind on posts, my first parts hadn’t come in yet and the whole thing started getting nebulous. I’m being dramatic of course, but its sort of about our relationships to stuff, atoms, brick and mortal- real world stuff. I had a full figure in captured via screen grab in Rhino- fun to show around to my son or supportive friends, but it just wasn’t going to be the same until I had all the parts in hand.
Today is that day. Holy smokes! I forgot what it was like to have ‘first shots’ in your hand. Obviously, I’ve posted about the parts and the fit and finish of the material, etc. But today, I actually had a product in my hand. Something I could move around and pose and really understand the proportion and personality of what I’d created and assembled. Its a feeling that you don’t get everyday, or at least maybe its one you become accustomed to over time. Each subsequent, item becomes a little more mundane out of familiarity until it all blends together. The big difference here is that its something I did myself. I didn’t need a staff of designers, engineers, marketers, salesmen, huffing and puffing about why it doesn’t fit the market, or the brand portfolio, or won’t pass safety. This once, I’m just swimming in good vibes and the playful optimism, enjoying a job well-done and a blurry glimpse at what might be on the horizon.
So! Back on track. The one part that I have ordered in what I think is the right material is the torso. Its the ‘polished’ variant of the Shapeways strong and flexible option. I think it only comes in white and black, but I’m going to try to order one whole figure in that material to see how it all fit together. All the other parts pictured are the basic white or unpolished option- which is much grittier than the polished. The grit creates a decent amount of friction in the joint, so the figure will actually stand. All that variation of the surfaces gives me a tight fit. But,… The ball joints for the ‘polished’ torso part have smaller balls and much less friction. To friction or not to friction is an important question- especially when a protofigure is $30 a pop. The polished part is pretty nice, though.
I’m anxious to get the basic figure debugged and then opening it up for sale in a Shapeways shop. In the meantime, I’ll try a few on Ponoko and get a few made on a MakerBot to see the relative benefits of each. Then, on to outfitting this guy to see how far I can take this customizable figure concept. I’ve still got a good amount of stuff up my sleeve. Onward.


Parts!!!

So, I finally got my first batch of parts, more than a week past my scheduled delivery. It was really exciting to open the box. I had no idea what to expect.
The parts were three pairs of upper arms shot in two different materials. It was pretty apparent which material to move forward in, especially since I broke one of the black sockets without even applying much pressure.
Surprisingly, the hi-detail prints, which are the more expensive choice, are actually less detailed than the ‘strong and flexible’ plastic. Since I had already ordered more parts, I got extremely lucky that I selected the ‘strong and flexible’ over the ‘detail’ plastic stock. The strong and flexible stock seems to be a styrene of some sort. For ball joints that need a certain amount of flex and grab, it seems to work perfectly.
As far as the function, the tolerances of parts seem pretty much without too much distortion. There seems to be a bit of shrink built into the process. My ball joints are measuring at 5.9 mm instead of the six I spec’d. I can also see that I need to make the balls a bit larger to stretch the socket a bit, which seems to make for a better fit. Next round will build a larger ball.
Oddly enough, my next order cam just two days after the first even though they were order two weeks apart. As disappointed as I was that my first order was crazy late, it was spectacular to have more parts in hand to compare to the first batch.
The second batch consisted of two torsos- one with a Xevoz-compatible square socket arrangement and another with the squares at tilted at a 45 degree angle (more on why that might work better in the future). I also had a Xevoz-compatible forearm set-up and another with the tilted square plug. I also tried a new set of upper arms with a through hole in the ball socket to minimize the material usage. The open socket might work with a thicker wall, but in this round I also reduced the wall thickness on every socket, as well. The socket just doesn’t have enough material for a robust snap.
I order several different colors to see how much variation there is between formulations, granularity of the print and the saturation of the various colors. Its likely an optical illusion, but the white does seem to have the cleanest print of them all. I like the two colors- red and a ‘cornflower’ blue. Even the gray of the torso part is decent but they all seem to be much more granular than the white. I’ll continue to order in white for now. It seems to be the better material.
-
- ‘Detail’ vs. ‘Strong & Flexible’ prints
-

- The not-so-detailed prints- note the broken black socket
-

- Front and back detail of the arm parts
-

- The colored parts (retouched)
-
- Two plug systems
-

- Assembled parts
-
- X-compatible part assembly
-

- Trying a plug-on backpack

-

- Fits a hand and a back pack
-

- Round peg, Square hole

ModiBot Hex Figure Kits- Buy one now!!! @ Shapeways.com

ModiBot Hex

